
You want a smooth surface that looks great. You know that being exact is important with Epoxy Resin Systems. Careful setup lets you stay in charge. Measuring things right helps you stop errors. Mixing well begins the hardening process. Putting it on the right way makes strong, long-lasting polymer solutions. Every step helps you get expert results with industrial resin and epoxy coating.
Epoxy Resin Systems Basics
Chemistry and Performance
Epoxy Resin Systems help make coatings that are strong. These coatings work on many different surfaces. Epoxy coating makes a hard layer. This layer keeps out water, chemicals, and scratches. You can find these coatings in garages and factories. People also use them for art projects. The chemistry in Epoxy Resin Systems gives a smooth finish. When you mix resin with hardener, a reaction starts. This reaction changes the liquid into a solid layer. The finish is tough, shiny, and lasts a long time.
Mixing and Ratios
You need to measure and mix Epoxy Resin Systems carefully. Most systems need a certain ratio, like 2:1 or 1:1. This means two parts resin and one part hardener, or equal parts. If you do not use the right ratio, the coating may not harden. Always check the instructions on your product. Mix the resin and hardener slowly and well. This helps stop bubbles and makes the mix even. Good mixing helps the polymer solutions harden and gives a strong finish.
Tip: Use a clean container and stir stick for each batch. This keeps your mixture clean and helps you get the best results.
Advancements and Blends
There are new types of Epoxy Resin Systems now. Some blends use polyester or other things to work better. Nanocomposites add tiny particles to make coatings stronger. UV-resistant formulas help protect from sunlight. These new types let you use epoxy coating in more places. You can use them on outdoor furniture or resin floors. You can pick a system for extra strength, better looks, or more protection.
Curing Process
Cure Stages
You need to understand how curing works to get the best results from epoxy coating. The curing process has three main stages: liquid, gel, and solid. At first, the mixture stays liquid and easy to spread. After some time, it turns into a gel. You cannot move or shape it much at this point. The last stage is when the coating becomes hard and strong. Each stage affects the final surface finish. If you touch or move the coating too soon, you can ruin the smooth look. Always let the product cure fully before using the coated item.
Temperature and Volume
Temperature changes how fast Epoxy Resin Systems cure. Warm rooms make the reaction go faster. Cold spaces slow it down. You should always check the temperature before you start. The amount of resin you mix also matters. Large batches can heat up quickly and cure too fast. Small batches give you more time to work. If you want a perfect surface finish, keep your workspace at the right temperature and mix only what you need. This helps you avoid problems like bubbles or cracks in your polymer solutions.
Tip: Use a thermometer to check your workspace. Keep the temperature steady for the best results.
Hardener Selection
You must pick the right hardener for your project. Some hardeners work better in warm weather. Others help you get a strong finish in cooler places. The type of hardener changes how your industrial resin cures and how tough it becomes. Always read the label and follow the maker’s advice. The right hardener helps your epoxy coating last longer and look better. If you want a strong and shiny finish, choose your hardener with care.
Surface Prep
Cleaning Methods
You need a clean surface before you start with Epoxy Resin Systems. Dirt, oil, and dust can stop the epoxy coating from sticking well. You can use a vacuum, a brush, or a cloth to remove loose particles. For greasy spots, try a degreaser or rubbing alcohol. Water alone does not remove all oils. If you work with concrete, sweep and wash the floor. Let it dry fully. For metal, use sandpaper or a wire brush to roughen the surface. This helps the industrial resin grip better.
Tip: Always wear gloves when cleaning. You protect your hands and keep the surface free from skin oils.
Bonding Types
You want strong bonding for a smooth surface finish. Epoxy Resin Systems bond in two main ways: mechanical and chemical. Mechanical bonding happens when you roughen the surface. The tiny grooves let the polymer solutions lock in place. Chemical bonding works best on fresh surfaces. The resin reacts with the material and forms a tight seal. You get the best results when you combine both methods. Sand the surface, then clean it well. Apply the epoxy coating soon after prep for maximum strength.
- Mechanical bonding: Use sandpaper or grinding tools.
- Chemical bonding: Apply resin to clean, fresh surfaces.
Amine Blush
Amine blush looks like a greasy or cloudy layer on your cured epoxy coating. You may see it when the air is humid. This layer can block new coats or topcoats from sticking. You need to remove amine blush before you add more polymer solutions. Wash the surface with warm water and a mild soap. Dry it with a clean towel. Do not sand the blush before cleaning. Sanding can push it deeper into the surface. When you remove amine blush, you help your industrial resin create a flawless finish.
Note: Check for amine blush after curing. Clean it right away for the best results with Epoxy Resin Systems.
Application and Finish
Tools and Techniques
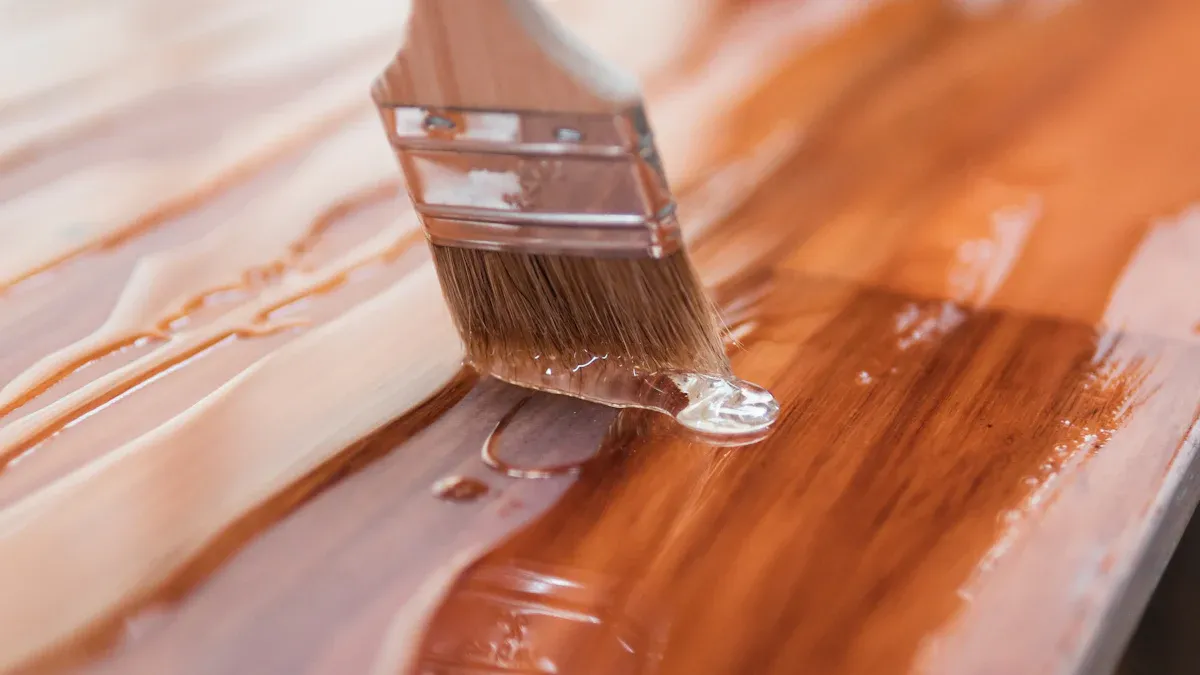
You need the right tools to get a smooth and even epoxy coating. Use a foam roller or a notched squeegee to spread the resin. These tools help you control the thickness. For small areas or edges, use a brush with soft bristles. Always pour the mixed polymer solutions in a line and spread them out. Work in one direction to avoid marks. If you want a high-gloss surface finish, use a heat gun or a torch. Move it gently over the wet resin to pop bubbles. This step gives your coating a glass-like look.
Tip: Wear gloves and use a dust-free room. Dust can ruin your finish.
Defect Prevention
You want your project to look perfect. Bubbles, fisheyes, and dust can spoil your work. To stop bubbles, mix the resin and hardener slowly. Pour the mixture from one container to another before you use it. This step helps remove air. Keep your workspace clean and dry. Water drops or oil can cause defects in the surface finish. If you see a bubble, use a toothpick or a torch to fix it right away. Always check the temperature in your room. Too much heat can make the industrial resin cure too fast and trap bubbles.
- Mix slowly to avoid bubbles.
- Use a torch to pop surface bubbles.
- Keep the area clean and dry.
Topcoats and Protection
You can make your epoxy coating last longer with a topcoat. A clear topcoat adds shine and protects against scratches. For outdoor projects, pick a UV-resistant topcoat. This type stops yellowing from sunlight. If you need extra strength, use composite coatings. These blends add fibers or particles to the polymer solutions. They help stop moisture and rust. You can use these coatings on floors, tables, or even boats. For the best results, let each layer cure before you add the next one. This step gives you a tough, moisture-resistant, and anti-corrosion finish.
Note: Always read the label on your Epoxy Resin Systems. Some products need special topcoats for full protection.
You get good results with Epoxy Resin Systems by doing important steps:
- Get your workspace and materials ready.
- Measure and mix polymer solutions carefully.
- Put on epoxy coating with the right tools.
- Make sure the surface finish and protection look good.
Learn about new things in industrial resin. Use smart ways to make strong coatings. Keep learning so your skills get better and your work looks professional every time.